Friday, December 16, 2022

A Little Holiday Quilting

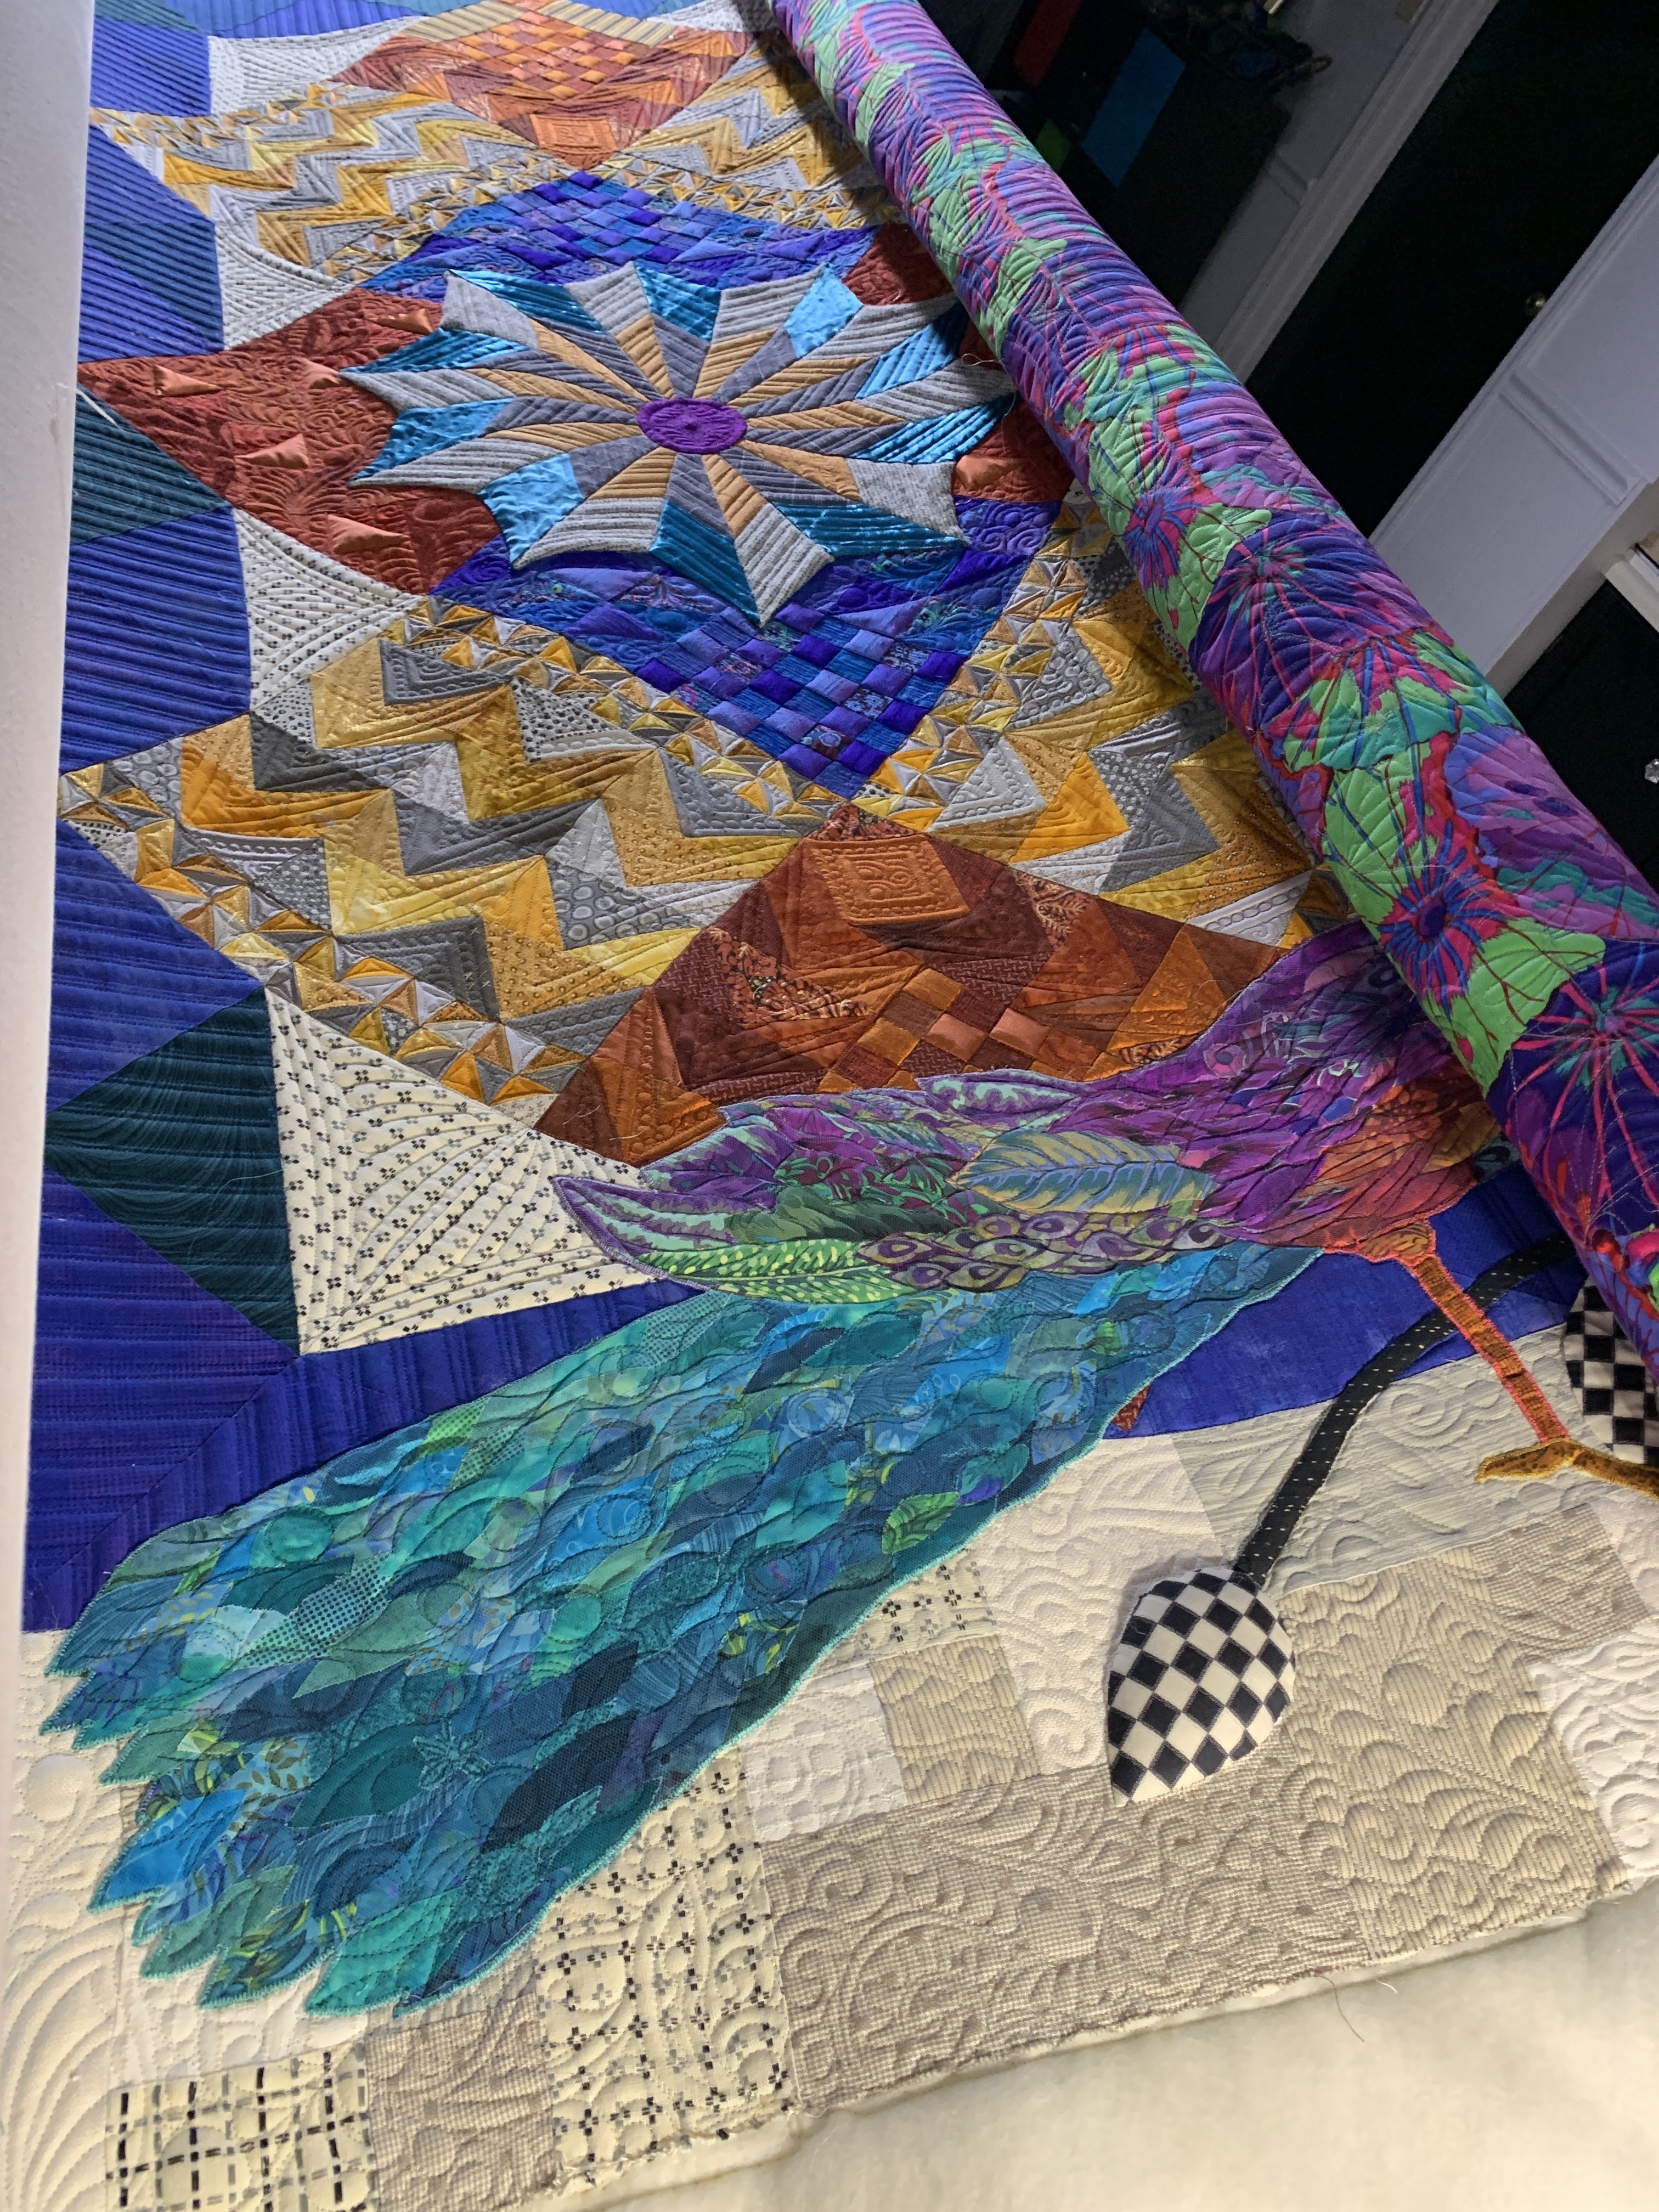
Did you make any gifts for the holidays?  I'm in a small but very talented quilt, Friendship Star in Crystal Lake.  These ladies are avid quilters and they make the most beautiful things.  For our Christmas Challenge we all got a fat quarter and had to make something as a gift. We have no idea who the recipient will be.  It's a bit intimidating for me, while I have the quilting down pretty well, everything that comes before is certainly questionable!  My first thought was a bag.  I've wanted to make the Dancing Diamonds bag for years and the fat quarter that we were given would be just perfect for it.  Now any of you that know me, know that for one reason or the other when I go to make a bag all the sensibilities that I possess run and hide in a closet, a cozy for a nap, but they there's no sensibility left in me.  It's the strangest thing, but it's very true.  But some day I will prevail and this bag will be mine!!  


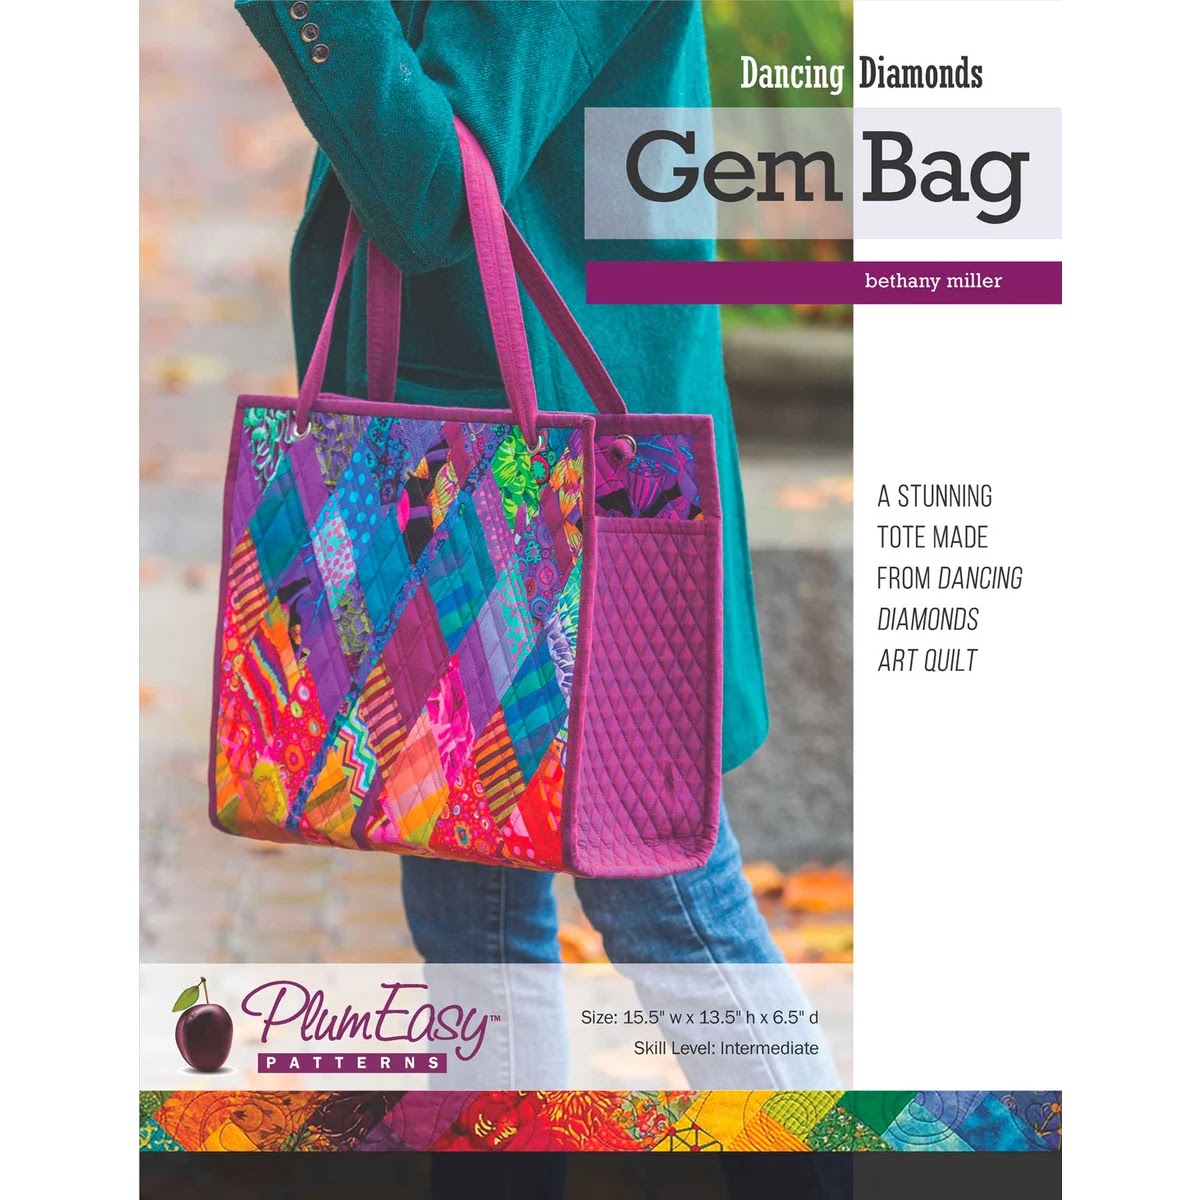
I get ready for this bag, convinced I am going to turn the corner in this wonderful bag making world and I can create something just as amazing as the other ladies in this guild.  I have my coordinating fabrics, I cut my strips and I'm ready to go.  As soon as I laid my strip from the fat quarter I realized they were not cut for diamonds.  My heart sank, I have this bag curse that I just can't shake, dang it.  But time is running out, there's only a fat quarter, and I needed every inch of what I had.  

I quickly scour the internet for ideas that will not be nearly as spectacular as the bag planned but certainly there could be something that would be pleasing.  Then I found a runner from Crate and Barrel or Pottery Barn and like many quilters do, I thought.....I can make that!  And so I fell into my comfortable quilting corner and made a runner.  I'm not sure I got many pictures of it as I was riddled with quilt at first not giving a second try to the bag and then blatantly taking the pattern I say and making it and not even giving the proper credit (I looked for it again and couldn't find it....I tried). Shoot didn't even take a picture after the binding was on!

If you're still with me, I can give you just a few details on what I did.  It's really a simple pattern with the ornament on the ends (using the fabric that I was able to salvage).    I used  my Accuquilt circle die and cut the circles and then a couple of 1.5 in strips for each end, fused them on to a 14 in width of beautiful green fabric.  Then the fun begins!!!  All my sensibilities have returned.  


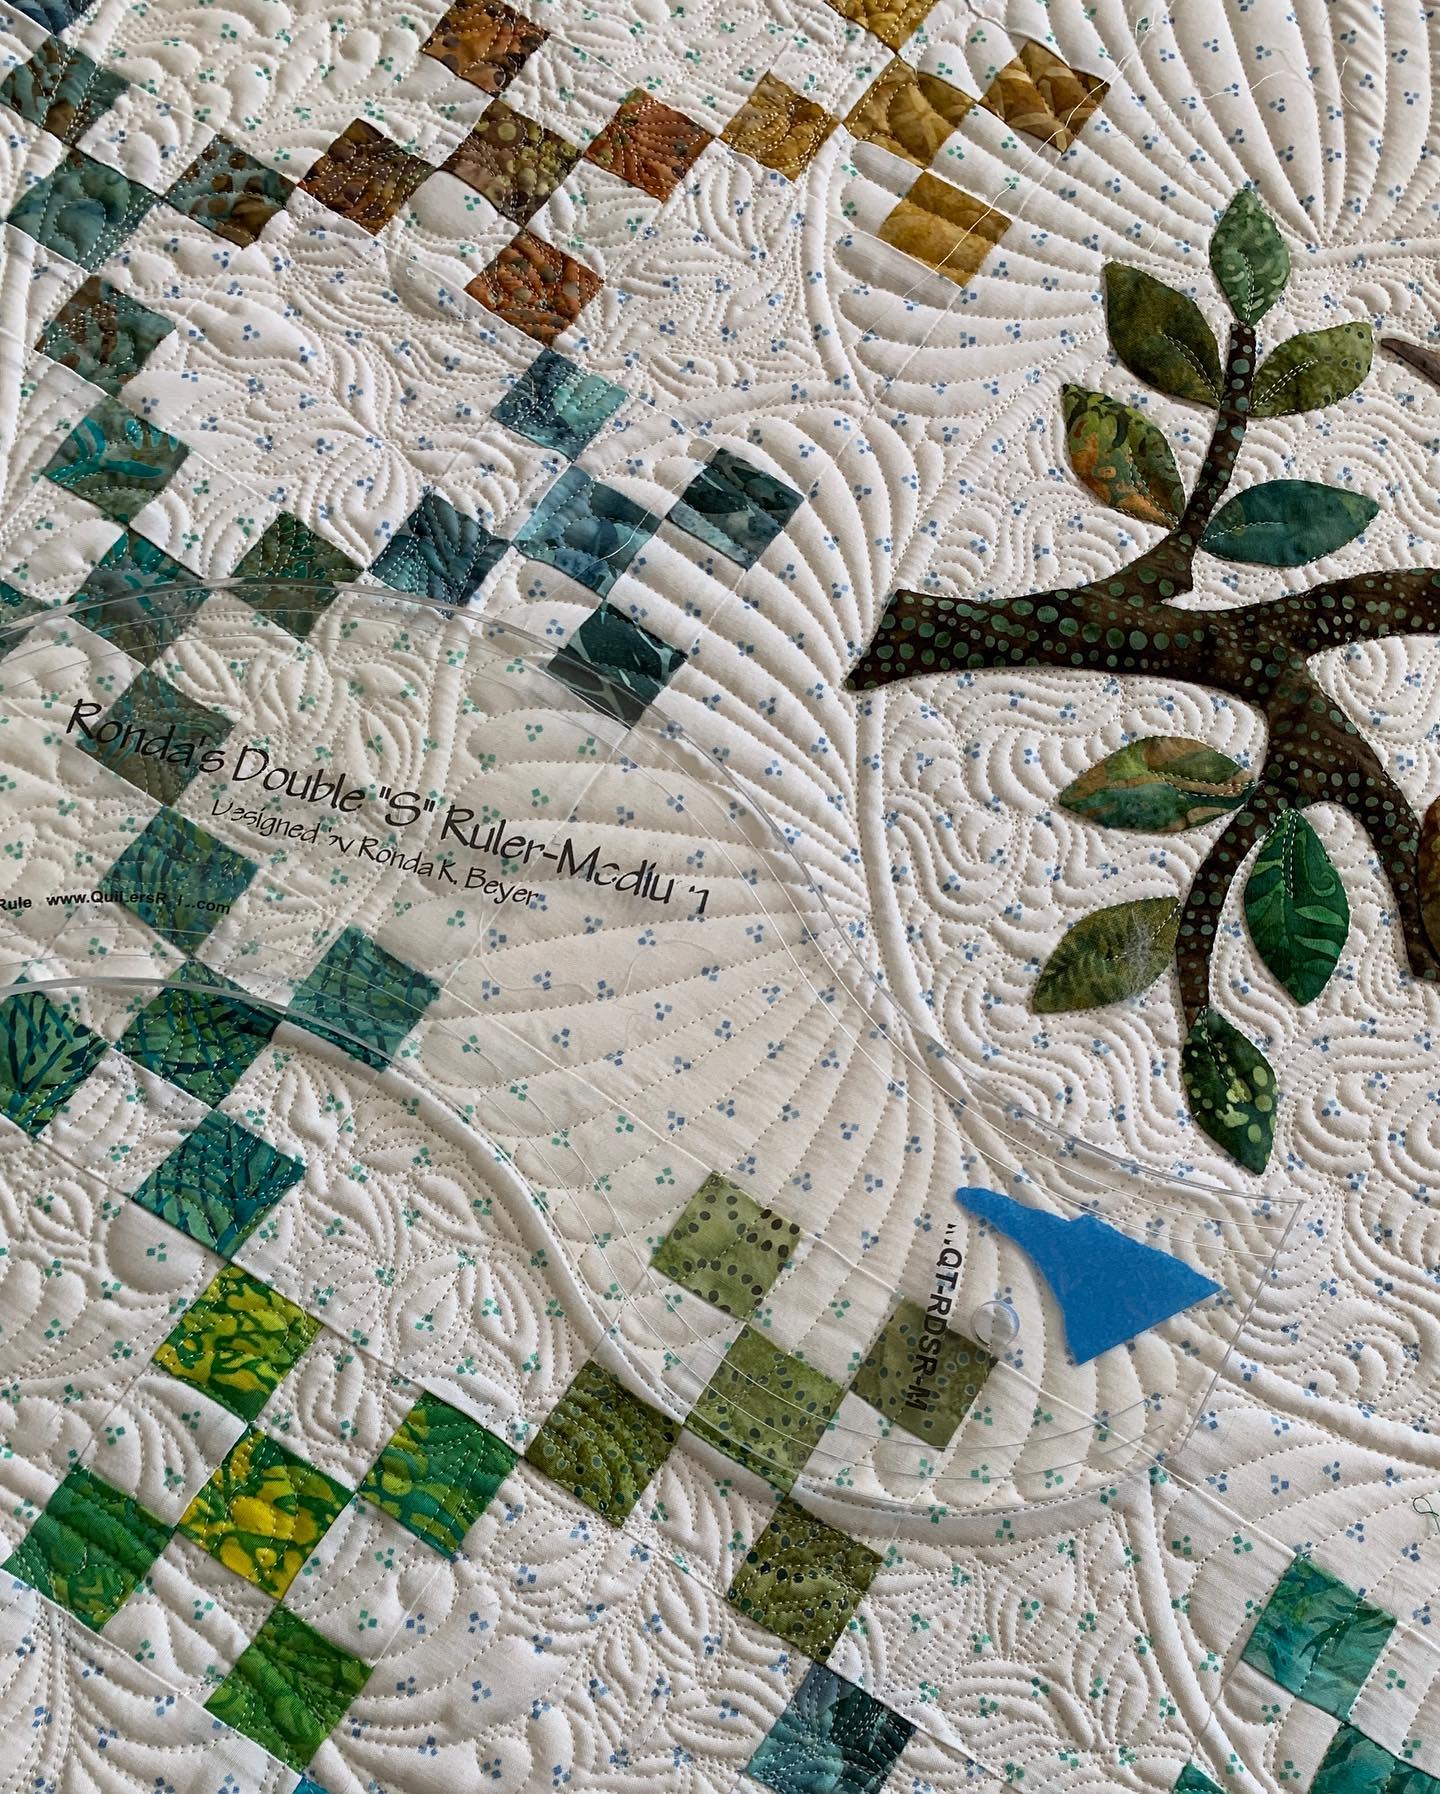
So this runner needs some fancy quilting and I am in just the mood to quilt something to death, I need a win!!  I wanted to evoke the sense of an vintage ornament in the middle of this modern runner.  I found the center and started marking.  I used the Leisha Kaye Circle2 (circle squared) rulers for this.  The 10in for the outer circle and the 5 in for the inner and the 8 in for the top and bottom.


Then I got to quilting. I've got two layers of batting, Quilters Dream Blend with Wool on top and 60 wt thread top and bottom.  I normally don't like to use different colored threads but thought  this one need just a little bit of something different so I added a Christmas Green to the cross hatched center and top.  Finished it off with a lovely teal binding.  The recipient loved it. Someone asked how long it took to quilt it.  I just explained that it took longer to sew the binding on than it did to quilt it!  I'm the slowest binder ever.


So what do you think?  Does it bring out that vintage glass ornament?  I sure hope so. I hope you and your family have a wonderful holiday season however you celebrate!  I hope there's lots of stitching time as well.

Check out the linky parties on the side bar, lots of inspiration out there

Tuesday, November 15, 2022

A little birdie told me.....

 I finished Jeanne's little quilt. It is super sweet with the rainbow position nine patches and the background to match as it travel around the circle.  The pattern is Rainbow Nest by Editya Sitar.


The quilting...that's the part I love!  Lets start with the batting an the thread.  Two layers of batting, Quilters Dream 80/20 under Wool.  Look at that Applique, it has such definition with the two layer.  Almost looks like trapunto doesn't it?  Thread, well you know I like to use a lot of thread.  So I use Glide 60 wt top and bottom.  

Now for the quilting designs.  My first decision was to treat the 9 patches as a large border rather than individual blocks.  Once I got past that, things fell into place rather quickly.  I knew there had to be a frame for the bird in the nest and of course what goes well with birds?  Why feathers of course!  I got my Rhonda S Ruler and used that for the frame.  I wanted each side to have the feel of a birds wing.  There are mirror images used by simply flipping the ruler to the other side.  


I also wanted to spotlight the nest and the bird.  So I found my Lsheia Kaye from quitingit.com 13 inch circle and we had that covered.  


Lastly, I wanted the finaly borders to have a tree like, bush like something natural along those.  I marked an S curve using Julia Quiltoff's  5 ruler.  I had this going up the side and long the bottom, then in the other corner going across the top and down the side.  I used a feather, leafy, loopy natural thing (yep that's the technical name).  


To finish off I used three different fills. For the center circle I did McTavishing, I just think it gives such movement and really highlights the piecing.   the inside border (between the feather border and the feather frame) I used an dense leaf feel to add to the natural design.   Finally finished with a  little less dense curls design.


Next up is a beautiful tradtional quilt.  I've been craving traditional for some time.    Check out the linky parties in the side bar, lots of inspiration out there!

Monday, October 24, 2022

Country Jane is Done!!

What a labor of love this has been. Over 30 women created this beauty over the course of 2022 and now she's ready for the Country Quilters of McHenry fund raiser.  She has two layers of batting, Quilters Dream 80/20 with Wool on top (oh just look at the puffiness in that piecing!)  Glide 60 wt Linen was used top and bottom.  And most importantly she's done!!!


I'll have full details of all the items and better pictures next week.  Just send me a message if you'd like tickets, we will ship the prize to the winner if the lucky person is not local.

Have a great quilty week and check out the side bar for some linky parties with great inspiration

Monday, October 3, 2022

I'm back and Country Jane is with me!

 Did ya miss me?  Oh my, it's been so long since I've had a stomach flu.  I think as you get older it may take a little longer to get through things or maybe we're just getting around all those germs again but it took me 4 days to get over that stomach virus.  Daytime TV is the worst and I'm hoping I don't have to watch any for a very long time!!  But I'm back to feeling human again and Country Jane, which is Country Quilters of McHenry's 2023 Opportunity quilt, is on the frame!!!!  Oh there is some work to do on her.  30 different quilters made the blocks of all different skill levels.  So fun to have so much participation in the block creation.  Now the best part, the quilting.  I used EQ8 layer 2 to create the templates for the scallops (the third pic), the outside line is the cut line and in the inside line is the sew line.   Someone with more skills than me is going to create the binding and sew it on.  But I can't wait.  If it turns out to be too hard or we just can't get it for whatever reason, you know, things happen....I have enough room to cut so she has a straight binding. Phew, plan A and  plan B.  One of them will definitely work.


So far I have almost 4 of 15 rows done.  If I can get 3 rows done today (I've never done this but I'm feeling better everyday, so it could happen and hoping the quilting Gods will be with me) then she'll be more than half way done, yea!!!!

the rulers aren't too bad, but for some reason I have 3 little snips and 3 seam rippers that are always on there.....always something new

Remember my crazy mess of design wall from last week, well here's one of the creation that came from that mess, this is Modern Millie and she'll be part of the opportunity quilt raffle as well as an amazing embroidered coral reef bag.   You're gonna want to be part of this!  Tickets will be coming by Oct 27!!  Just let me know if you would like some and we can get you hooked up!

Modern Millie - she's made with some yummy cottonwood fabrics, silks, silk velvet and a shot cotton. She's on her way to get her quilting done today, she's gonna look so good!  It really is square, I'm just not the best photographer....

And this bag made by Kim Berry Rogers - wow, she has made a work of art, the colors the textures, all of it so amazing.  I can't wait to get some better pictures of this one. 


All three will be part of our raffle coming soon!!  Better pictures coming soon too!  This is just a little tease.

Hope you had a great week and will have the best quilty week for the first week in Oct. I just love the late season hydrangeas - they really say hello fall so wonderfully!!


Need more inspiration?   Check out the linky parties on the side bar, something for everyone!

Monday, September 19, 2022

San Marco BOM

Happy Monday Quilters!!!   If any of you know Lynn Schmitt from a different box of crayons, then you know she does the most fabulous BOMs every year.  They are saturated with color, with texture with all sorts of materials from quilting cotton, to silks to home dec fabrics.  And this is Kim Rogers version of San Marco.  If you know Kim, you know there's going to be a beachy vibe and this one did not dissappoint. She changed up the center medallion, the bird and the border and made this her own.  Wow, the silks shimmer and shine don't they?  Ok so lets see if we can talk about the quilting of this beast a little.

San Marco BOM from A Different Box of Crayons

I'm not gonna lie, it was tough!!  Usually you have a theme that you can pull through a quilt so that once you get the first block or two done, then it's a breeze and just execution.  With this quilt there were multiple areas that needed design  which was different from other areas so it felt a little like design, quilt, design, quilt, repeat.  So here's how I tackled it.


First it's a custom job so I loaded sideways.   There is is some extra stuffing in the buds (can you say puffy sleeves) and I don't float quilts that are larger than a baby quilt, so the buds and the vines went first.   The first border with the black and white sqaure in square block was easy. They are very graphic simple design but the quilting won't so up  well so just a continous curve along the outside and the middles did the trick.  Of course we need feathers, it's a bird quilt after all!  so simple feathers in the colored triangle. So far so good!


Next we move to the vine areas.  We have the paper pieced triangles which only get continous curve and straightlines in the background easy peasy yet very effective.  The background of the vines I always new was going to be a feathery, leafy swirly background fill.  The buds, well nothing needed there!  The quilting on the leaves I talked about last week.  The leaves on the vine were a unique shape, I didn't have any rulers for those curves so I just marked the vein free hand, making sure they were all similar and I think they look nice, leafy just like they should be! Then the last of the easy things...the dark blue border which I really wanted to enhance the frame and have that linear break from  free flowing vines.   Three lines 1/8 inch apart, then 1/2 space did the trick.  And then things start to get a little tougher...more design elements, more quilting designs needed. 


And then things start to get a little tougher...more design elements, more quilting designs needed.  I started with the Medallion.  I really get a 3D vibe when I see the medallion.  I wanted the quilting to bring out some of that as well.  I chose lines 1/4 in  then 1/2 in at the same angle as the seam.  The thread just sank into that wool!! I didn't want too much quilting on any of the silks so they didn't loose that shine.  


Then we go on to the blocks surrounding the medallion.   I wanted those quilted densely to help with the 3D illusion of the medallion.  I just carried through the background fill from the vines but also leaving a few of the silk triangle unquilted.  They just shimmer in the light!!  On the blue postage stamp areas (and the rust in the next set of blocks,) I filled the blocks that weren't silk with match stick quilting and left the silk unquilted.  That rust color silk, it just looks like copper on that quilt doesn't it?


Next we have the last set of colored blocks.  These I thought were a bit easier to design, it just needed the arrows and  a little fill for texture.  I kept the same arrows in both the gold and the rust color blocks.  In the setting triangles, just keeping it simple with a little crosshatch and some feathers, similar to the colored triangles on the first border.  Pulling the designs through.  


The hardest part for me to stitch was the bird!!!  This is a beautifully collaged peacock with a layer of tulle over it to keep the pieces all in place (Susan Carlson has some great tutorials and suggestions on this).  But I dunno about you, but I can't remember the last time I've done a custom quilts and not taken out stitches.  Not only that but you can't take stitches out of tulle, seam rippers and tulle are not the best of friends! You have to do that from the back and I had no idea how that would work or what would happen.  So, I just knew that whatever stitches went in were staying and there were no redos.  I wanted less quilting on the bird as he is a similar color to the border, so I wanted, puffy and cruve to differentiate between the linear and dense.  This is what we got.  It took a lot of staring before those first stitches were sewn!

I love Kim's embroidery on the Peacock


The final border was more of the same, a vine with the same leafy, feathery feel from the vines.  I do wish I would have made the fine 1/2 in thick rather than a single thread.   But by the time I go to that I just wanted to be done!!  I added a small bud in the corner, but no puffy sleeves!!  

I used mostly 60wt glide thread.  I did switch to a smoke colored invisible thread for the bird. Two layers of batting, Quilters Dream Blend with Wool on top.  It's very difficult to see the thin thread on the home dec and wool fabrics.  I think I may go with a 40 wt thread when I do mine.  Yep I have one too, mine is a little different from Kims. We both made ours our own.    I can't wait for the next one!

I'd love to hear about your quilting adventures how you decide to do certain things.  Leave  your name and a link to your post and I'll be sure to check it out.

Take a look at  linky parties on the side bar, so much inspiration out there. 


Wednesday, September 14, 2022

Working on Wednesday

Well its been a little over a week and San Marco,  a BOM from A Different Box of Crayons, is not done, and the table is no longer clear!  But I can show a few progress pics.  I do hope to have it finished today or tomorrow for some Fresh off the Frame picks on Friday.  I will have a finish!!!  I won't be denied!

look at the shimmer of the silk, I'll have better pics the end of the week.

and the rulers, why why why do I have to pull out so many rulers when I do custom work?

Ok so what happend in the last week??

I got a nother squash squad completed and started on number 5, all shananagans with that block have stopped temporarliy!

Squahs Squad #6

I am so close to finishing San Marco.  This was a tough one and I made this quilt too.  So as I'm designing the quilting motifs I'm trying to figure out how I will quilt mine to look a big different from Kims.  The other thing that made this tough is the number of different design elmements in this quilt. It was like desiging for 6 different quilts but still trying to tie them all together.  In the end I think I have a cohesive design which adds to the pieceing and doesn't take anything away from the quilt.  Fingers crossed....lots of thread on this.    I'll give the details on threads, batting etc on the Friday post.  In the mean time, hopefully these will keep you coming back for more.  Here's a picture of how I marked the large black leaves.   I really didn't have a ruler to do what I wanted so I just did it free hand.  I did want to mark them though so I could see that they were at least somewhat consistent before I stitched. I actually tried the first time to just go all willy nilly and stitch some beautiful design on those leaves, but everyone on those stitches came out and I behaved after that!  Taking stitches out of a double batt when you're using thin thread is, well, it's just not fun!!

free hand marking of stem with chalk pencil, I only use white

much happier with these more consistent results.  Do you see the peacock checking out my work???

The modern lap quilt is done. This will be part of you fund raising for one of the guilds that I'm in, I should have tickets the end of October.  We'll have Country Jane (based on dear Jane) this Modern Quilt and an incredible embroiderd bag.  Country Jane is going on the frame next!  This quilt is just so yummy!!!  This modern baby is made with Cherrywood fabric (my very favorite fabric), Silks, a couple different types, some silk velvets, and a shot cotton, yummy, yummy, yummy.  Just need to get it quilted.  I think just some modern straight lines, what do you think?  Maybe some big stitches when it's done......

I need a name, please name me

And finally I'll leave you with a little treat from by garden.  It took a long time for the monarchs to get here, the swallowtails are long gone but we still have a couple of monarchs, they soon will leave us for the migration to Mexico, but I do enjoy seeing them as long at they are here.  And the hydrangeas, I pick them from the start of the annabelles blooming until thanksgiving, just love them so much


Check out allt he linky parties on the side bar, have a great quilty week!