Showing posts with label Applique. Show all posts

Monday, August 29, 2022

Variegated Spools

 Jeanne does such wonderful applique.  I've tried a few different ways, and ugh mine looks like well maybe I should just say it doesn't look very good. So when I get a change to quilt with  exquisite applique, I enjoy every single minute of it and this was no exception.  The spools have so many different fabrics, it was fun to look at them all. But this baby is done!!

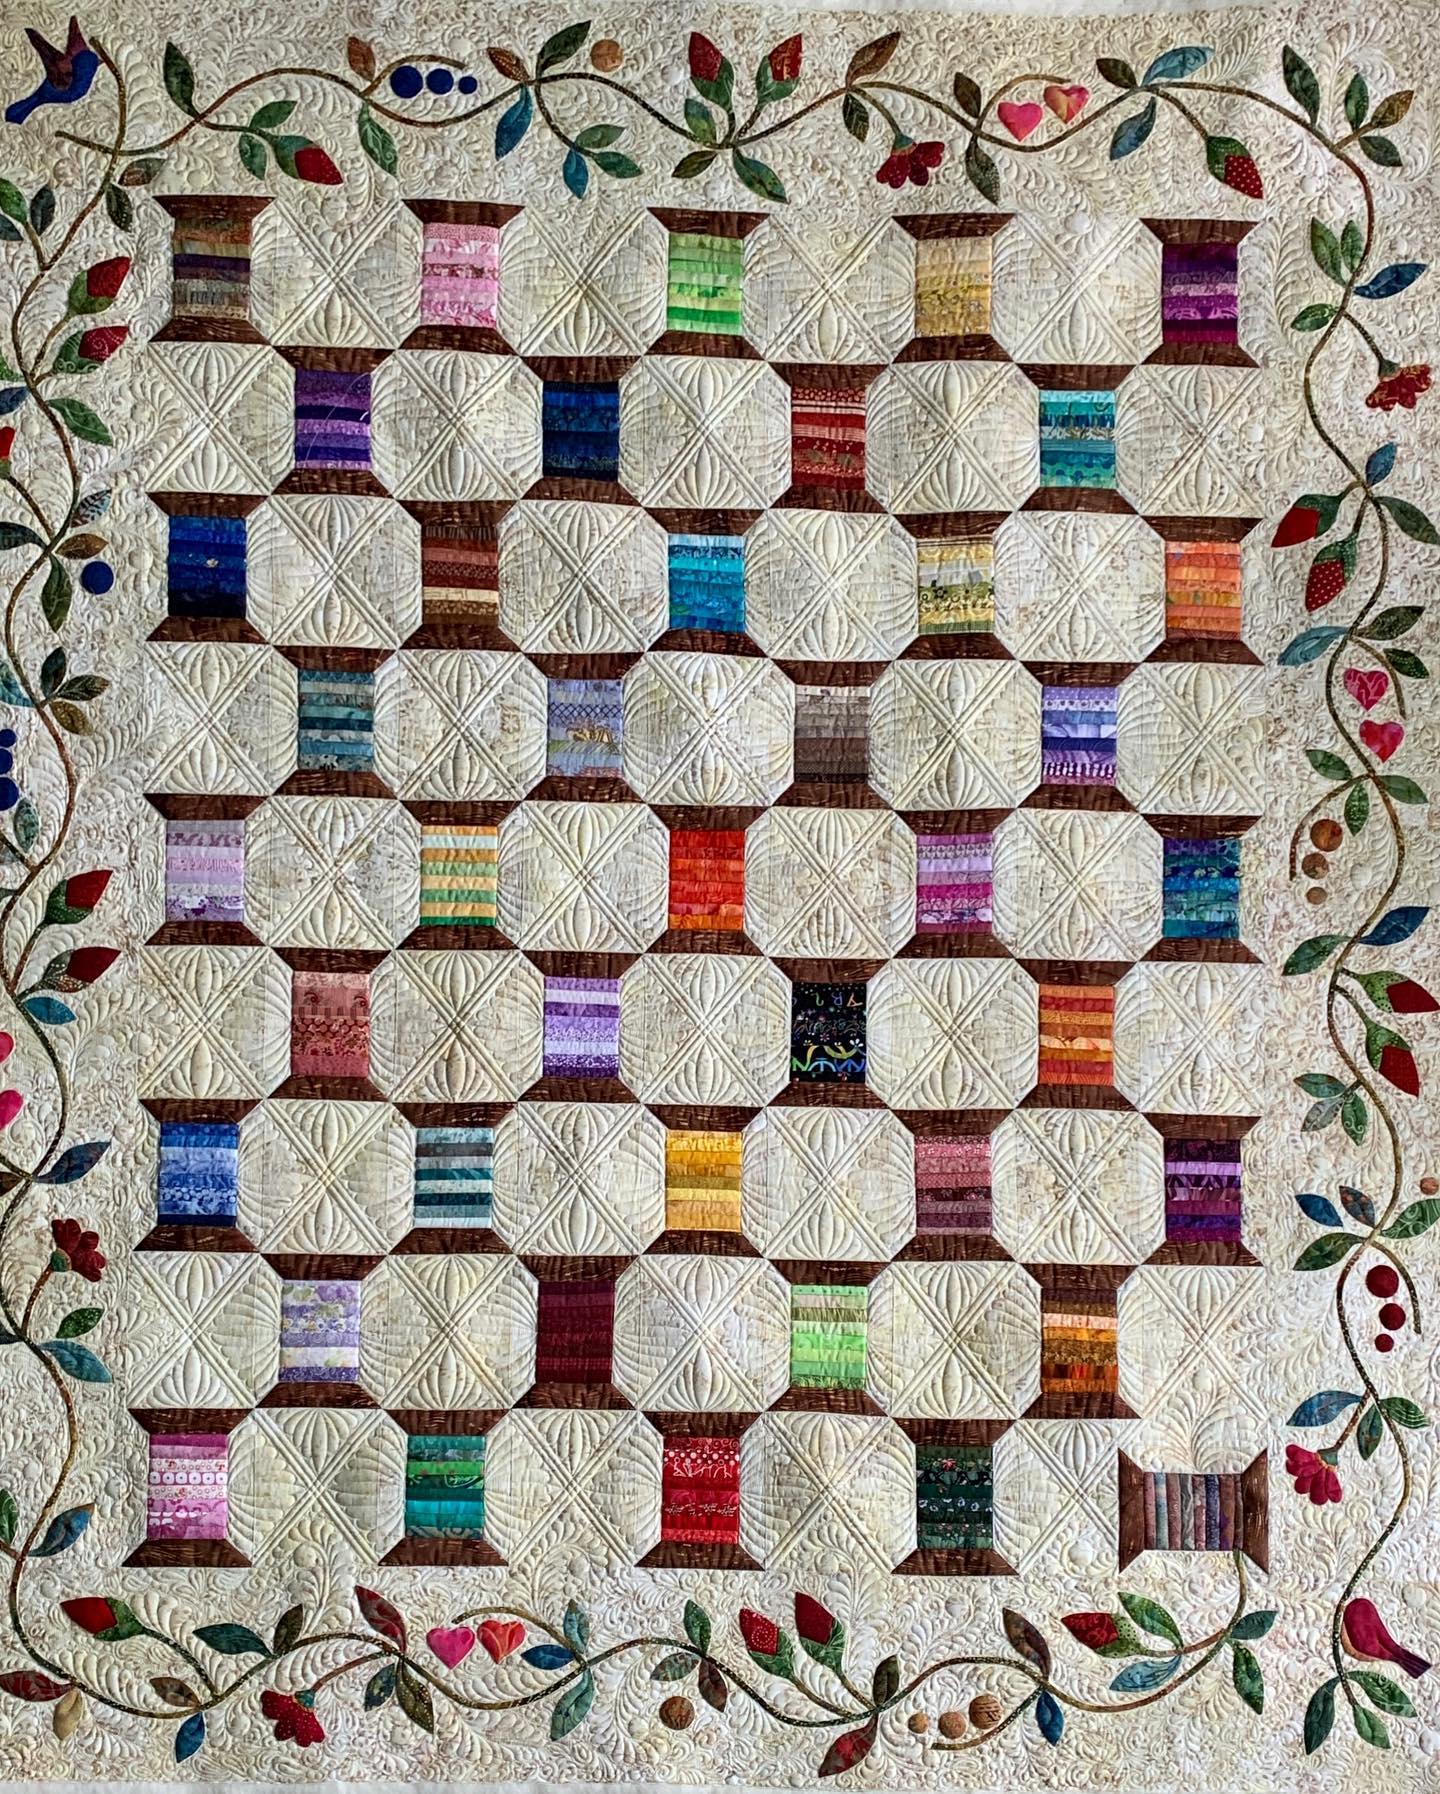
Variegated Spools - Laundry Basket Quilts - Pieced by Jeanne McGill


Some details on the quilt 

Pattern - a modified Variegated Spools from Laundry Basket Quilts (I love the two birds)

Batting - 1 layers of Quilters Dream 70/30 on the bottom, Quilters Dream Wool on top

Thread - Glide 60 wt top and bottom

Rulers - Quilted Pineapple 12 in straight, Julia Quiltoff small straight ruler, Quilters rule (no idea what the name of the ruler is but I use it ALL the time and Scully for the applique.  I start using Scully for applique at the beginning, then just use my hand on the quilt and my non dominant had to guide the machine (I can't explain it but it works!).  I the mornings I will start with Scully then switch.  He's great for going around irregular shapes but ya gotta go slow no matter what!!


Other - a fine line air erasable pen and  a sew line water pen to erase.   I marked the centers of the blocks between the spools for the feathers.  I mark a block, quilt, erase, move to the next one.   I do NOT mark for the straight lines , only for the center of the feathers.

Time - this one took between 18 - 20 hours and I believe I quilted everything before it came off the frame, hallelujah the quilting Gods were on my side this time!

Other findings.  I'm embarrassed to admit that I have over 700 hours of stitch time clocked on this machine and I have never changed the check spring.   I've been able to quilt but lately have been struggling with tension with threads that normally work just fine.  So I did it, I changed the check spring and everything about quilting changed! Wow, tension fixed right away and stay fixed.  Why did I wait so long and how is that you are suppose to be able to tell with your spring has sprung?   I mean hey if ain't broke don't fix it! How often do you change your check spring???

I've got some sweet little teacups up next.  It's a  little one, can I get it done in a day?  Shoot I don't feel like I can get anything done in a day!!

I may have an opening in Oct / Nov if you would like custom quilting.  I can always fit an edge to edge in between the custom quilts.  I'd love to quilt for you.  Just hope over to https://suedaurioquilting.com/ there's a form at the bottom to contact us, I'd love to quilt for you.

Lots of link up parties see the buttons on the side bar, so much creative goodness out there waiting to be shared.


Tuesday, August 23, 2022

Do people still read blogs? Northern Wilderness Quilt

Hello!!!  Is there anyone still out there?  It's been so long since I've blogged on a regular basis, 2018 ish????  And to be honest I've been using a lot of social media, facebook and instagram.  I just can't get into tic tok right now but I hear there's a boat load of stuff on there for quilting and crafts as well.  How do people do it all?

I retired this year  (hehehe so I can quilt more!! )and there are a number of occasions where I sat down and wanted to find out what regular quilters like me were doing.   So I opened up facebook (which I think has some really good  groups) and Instagram (which I think has taken a wrong turn since being purchased by Meta) and the inspiration just wasn't there.  Both of those platforms have  ALOT of adds and posts for business which is good becasue I'm pretty good at buying things.....not always that good with making things for those same purchases, but the potential is there!  However I wanted to see what real quilters were working on, not just the businesses that enable them.

The other big difference between a blog and a post on social media, is the content.  Blogs go into detail about the process the things that worked well, the things that didn't....you know what I'm talking about.  And honestly I want to show you what I'm working on  and see what your working on.  I'm interested in more than the shops and quilters that make close or more than 6 figures on the craft.  I want to see what those that are crafting are doing.  But blogging does take time....so we'll see if I can keep this up again.  

Goals for my blog are easy.  First to share my process and tools as much as I can.   I can show what works for me, what I liked what I didn't like.  I love getting comments from people on things that worked for them (I'm assuming there's still a person or two that reads blogs :).  Second to have  an archive of what I've make.  I did pretty good with the archives until 2019.  I know my producity was greatly reduced but there were quilts that were made, there were experitments gone both ways, good and bad.  So I'll try to catch up on a few of those for every new thing that I post about for 2022.

So with that said, I'm already a day late, I wanted to blog every Monday, but really do I need such strigent rules???  Rules are meant to be broken and I certainly wasted no time with this one!

What have I done in 2022?  I'll have to dig deep to find something, it's been a year!  When I said "bring on 2022 I'm ready"   I had no idea what is store!  But I was ready, almost, made it through and here we are today. Ready to be inspired?????  Lets start maybe with something that I didn't make but something that I quilted.

Theresa did a fabulous job on this #appliquequilt. It’s based on @northern_threads #northernwildernessquilt. Theresa made a few modifications, king size and she wanted the blocks to reflect her families travels to the national parks. Her and her daughter drafted a few blocks and it looks spectacular!! I have them all here! So hard to choose a favorite, but two of my favorites are at the end. Which blocks were modified?? First lets take a look at the whole quilt, wow, this will definitely be the star of the room! Its so big there's no way I could get a picture of the whole thing without a 12 ft ladder!

King Size Northern Wilderness Quilt
This quilt was meant to show all the national parks they have been to over the years, here's a couple they modified to better reflect their experiences.
He's hiking and he has a Cubs hat on in the top corner, int he bottom opposite corner you can see them white water rafting with the fire by the side of the river

She's in the kayak, I recognized her as soon as I saw it!

Her and her daughter drafted the train block, this was a special memory they wanted included and it's a fabulous block!!

I love when quilters do this, take a pattern and make it your own, personalize to you. This will certainly be treasured for many generations and I can just imagine future generations talking about the adventures that were had in all of the different blocks. Great job Janice
Here's a few more pics of the beautiful quilt -


Now for a few details on the quilting. This has one layer of quilters dream wool batting. Is there anything better than wool batting (provided you don't have allergies). I used a 60 wt Glide thread on top for all the dense background quilting. Mostly bottom line in the applique and pieced blocks. I try to do as little quilting on the applique and blocks so they really stand out in the quilt. If there is any area that has greater than a fist with no quilting, some will be add to help enhance the scene and provide a more consistent look to the quilting. Push the background back with dense quilting and that allows the pieced and applique to appear as though they are almost trupunto!

Rulers, you know there was not alot of ruler work but I think every ruler was on the table! I can't help it, even the straight line rulers, I used 5 different ones, totally not necessary but yet I can't find another way to do it!! Here's a picture of the threads, the marking tools and the key rulers after I cleaned up the others, oh it was such a mess! But neat and tidy for you!! If you're wondering why I have tape on the curved rulers, I do that so I know which part of the border nees which ruler and the location of where I should mark the dots for quilting. LOL I'd lose my mind if I didn't do that.
bottom line thread to match the applique and blocks

air erasable fine line marking tool and water filled pen for erasing (you dont' want to too much water in case the fabric bleeds.   And scrubbies, just in case you need to pick out a thread or two, they are great for catching those wayward threadst that have been rejected.

rulers, why do I need so many straight rulers???  The tape tells me where to put the registration marks for the border.

And just like that my first blog post of 2022 is complete. It's been a while since I've been in the linky parties, if you know any good ones, let me know, I'd love to join and go see what other are doing.

Have a wonderful quilty week!

Sunday, November 18, 2018

Busy Bee has a Big Dream

Oh my, I was busy with this beautiful bee quilt created by Kim,   I'm so head over heels in love with this one, I have to make one of my own.  I know you may have seen this on Facebook and Instagram.  But on the blog is where I'll go into more detail on the quilting process, how the quilting design came together, the things I loved, the things I didn't and would like to do better next time.....So with that, lets get to it! But first my most favorite picture of  this beautiful kind Bee.  I hear Kim might be doing a workshop by use, I hope so I really want to learn this process!

I really wish I had taken a before and after picture.  When I tell my friends about the business I'm starting, they always say "oh so you're making quilts and selling them, I like quilts"  Then I explain to the business plan for actually making a quilt is almost non existent.  It's nearly impossible to pay for materials, pay for your time (at a reasonable above minimum wage for a skilled worker) and sell a quilt.  I try to explain more about the quilting process, the three layers  and how hard it is to actual "quilt" , putting all those layers together.  And that is the part that I do.  That I love, that I just can't wait to get out of bed in the morning to do.  By this time I'm all wound up about the different quilting style, free motion, ruler work, fills, and I'm glowing.    Sigh, but the interest on the other side just isn't there.  Good luck Sue, you sound very passionate!  Yep, that's ok, those are the friends that don't have a quilt from me..hehehehehe.  So I started a new quilt and this time I have a before picture, sent to me by the owner.  And I'll definitely get an after.  Back to this bee......

Alright back to this quilt. That Bee did not have a single stitch in it.  It's a collage bee and it has all sorts of layers and little good things sprinkled all over it.    I knew this was going to be a hanging so no qualms at all with throwing down some thread.   On this quilt I didn't want a sheen on the thread, I wanted it to be like it was just a part of the flowers, so I used So Fine 50 Wt thread. Two layers of batting were used    ;  one 80/20 Hobbs heirloom and one Hobbs wool.  Originally I wanted to use a layer of Poly Down and Wool.  The dense quilting on the poly would make it stiffer for a wall hanging.  But with that stiffness you also get creases.  I have a panel with poly down and wool, I folded it to take to a guild meeting and the folds were still there a couple days later.  Thus the switch to 80/20.  And this is a panel which makes flatness less of a concern.  That gets the biggest questions out of the way - thread for the back ground and batting.  All that's left is the design.


Since this is a collage quilt I really wanted to have the flower petals enhance that collage look.  I also want the bee to look like it is popping off the quilt.  Originally I wanted to try Trapunto, but I've never done it and while I'm definitely willing to learn new things,  on a paying customers quilt just didn't feel like the correct learning environment :)  I knew I didn't want to have much quilting on the bee, only what it takes to make it pop.  I quilted in the ditch around the bee and then just barely inside the bee, about 1/8 in.  There is no stitching at all on this bee.  Just layers and layers of fused fabric.  as I did want to make sure it was quilted on and wasn't going to fall off.  I found other areas that I thought were interesting, like  the wings.  I quilted the segments of the wings to give them dimension and the words to draw your eye to look a little closer.  I can't tell you how nice it is to quilt something that tells you you're "Exceptional".  It really was uplifting in ways that surprised me!  I was very careful to only quilt the bare minimum on the bee to give dimension. The end result was great, it did look like trapunto!  I think the thickness of the fused layers, the wool and cotton batting and then the dense quilting around the bee, really accomplished the look I was after.   It was hard to get photos, but that little thing looks like it's just hovering right over it.  I used YLI invisible thread which worked great.  I had a bit of gunk on the needle which I used an alcohol swab to clean during the quilting and then changed the needle as soon as I was done with the bee.  Once done with the bee, it was a back ground fill party!!!


I've seen so many dream panels, wonderful ways of quilting.  Two stood out to me Margaret Solomon Gunn at Mainly Quilts of Love and Julia Quiltoff who you can find on Facebook.  Both of these artist have some mad crazy skills that I dream of aspiring to one day.  I love how they did both of there's with a different fill in each petal.  I wanted something very similar. I wanted dense fills in the center and then looser as you travel out from the center.  So the center being very compact, like it's just waiting to burst open into an amazing flower and the outside a bit softer and soothing like those first petals of a flower with all their beauty.  I got out my Fill book from Margaret  Solomon Gunn and got busy, I have my 3/4 in grids from Deloa Jones, I have my handy marking pencil, a couple of rulers to help guide and quilting is what I did.


I used 4 different shades of thread, machine run time for this quilt is 5.03 hours.  I had a couple of hours staring and thinking, marking, ripping a few stitches out.  But all in all an 8 hour job.  Total number of stitches - 90,940,000 - WOW almost 91 million stitches!!!  Now that's a whole lot o' stitching fun!

A little more about the tools of the trade.  I floated this quit , which I don't normally do on the A1.   The reason I floated this was the fusible was very stiff and I was worried how it would roll on the bar.  It was small enough quilt, I just floated it, all was good.  When I float a quilt, that's when the painters tape come in handy.  you need leave only your dominant eye open (hold a pencil up, and open one of your eyes at a time, with the dominant eye the pencil won't move)  tape the bar where the edges and any key seams you want to keep in line through out the quilt.  This keeps everything nice and straight.  My roll of painters tape is running out.  Love the green, the blue tends to come off a bit too easy for me.  Rulers you can't beat the set of curves from Quilted Pineapple.  That set is almost exclusively used by me for the bigger curves.  I used 8 on this on I think.  Deborah Pooles Rule it has become my favorite straight edge.  It has 1/8 in lines on it and it's just the right size for my hand.  I can control it better than most.   Of course the Kelly Bean from Kelly Cline is great for going around the applique.  Blue marking pencil.  I actually prefer these to the purple air erase.  They seem to come off easier.  The purple air when they are new take for ever even with a spritz of water.  And the good ol punce pad for the grid, make marking those grids so easy!!
 
Hopefully you've enjoyed some of the details about this quilt. If there are other areas you would me to focus on just let me know.  I love to share my process of long arm quilting with anyone that is willing to listen (or read!)  If you just want to look at the pictures (I get lazy all the time, just want to see some eye candy) I'll have that too!  Hope everyone has a great week and don't forget to check out the linky parties on the side bar, that's where most of my inspiration comes from!!

Sunday, January 31, 2016

Two Fun Finishes

I love baby quilts. They are so fun, so quick and you can try out all sorts of new things.  These two are for the twins that are due in April.  I got to try out quite a few new motifs.  I wanted something different on each quilt and different in each strip.  I think I did pretty good.  That wasn't the plan at first.  Rarely does my original plan actually look much like the finished product.  I wanted to do an all over free motion design with an elongated swirl and then echoing a few times in all the strips.  I hated it.  Took me ten minutes to quilt and 3 hours to rip it all out.  But really I didn't like it.  Then I decide ok, since fast and easy wasn't going to work might as up the complexity level, something different in each strip.  I got a little lazy on a few, just quilted the fabric, hey it works.  The zig-zag on Calvin's is interesting as it looks like different fabric on each side of the quilt doesn't it?  I quilted on the green line on one side, and the white line on the other.  The shadows make it look different.  I really didn't, and still don't, like the green peas in the first green strip of Calvin's but I just wasn't going to rip that out.  I don't think he'll mind :)  One of the arrows in the bottom of Calvin's the point is way off center.  Again I wasn't going to rip it out.  But the key lesson here, is that if you just look at those one individual things they may not look all that great.  But mix them up with everything else in the quilt and you might not even notice.  Now that I told you, it may be all that you notice!! I hate when that happens.  Details on the quilts, they both have Hobb's 80/20 batting, Premo soft thread on top, magna glide in the bobbins and super soft minky on the back.  Just love how the quilting shows up with minky. The fox is from The Red Boot Quilt Company, super cute. I had so much fun with these.  Can't wait it meet these two little guys.

Something different in each strip. Sometimes just using the fabric pattern was good and of course there had to be feathers

A little ruler work

Not that happy with the numbers, but I don't think Louis will mind.  If he does, I"ll make him a new quilt :)

Sweet little fox

Loved picking out the pants for the fox

super soft minky on the back

Love how that looks.  Hobbs 80/20 batting, magna glide in the bobbin, premo soft thread on top

Here's Calivin's, can't wait to meet them both

ruler work feathers, nothing but pure fun

The argyle pants are my favorite.  

Just using the fabric on these for the quilting motif in the striped and zig zag strips.  The zig zag looks totally different on the other side, the only difference is quilting on the green line vs the white. The shadows make all the difference
 

See pea pods thingys in the green, I really don't like it, but just left it and it's fine with everything else.  The zig zag looks totally different on the other side, the only difference is quilting on the green line vs the white. The shadows make all the difference
One got numbers the other letters.  


love the back of this one
And what do you do with the left over minky?  Why you make burp cloths!  The burp cloths that I made that match the quilts are with a towel which is ok.  But those minky burp cloths, wow, you could wipe my face any time with those.  I've got a few different scraps of minky left and will definitely make a few more. Here's a free pattern that I used, quick and easy. When the babies are done with them, they'll make the cutest dust cloths


Just a little progress on the quilt that has plan but isn't suppose to look like it has a plan.  Sheesh this looking like there is no plan is really time consuming!!  When I think improv and no plan, I think cut sew, cut, sew and boom you're done.  That is not how this one is going.  It's slow moving, only 4 more rows to go.  I've the got the true improv quilt on the frame, pretty excited to get started on the  graffiti quilting.


ready for some graffiti quilting, trying to pick a thread that will blend in yet I still want to be able to see it.

Done' forget to check out the linky parties on the side bar. I added a couple of new ones.