Thursday, December 29, 2011

My first "real" quilt just came off the frame!! and year end summary

This is Fair and Square by Bonnie Hunter.  I had started quilting this on my DSM. I had everything done except the string blocks.  Those were finished on April.  I couldn't wait to share so there's no binding, that will happen later today :)  It will be nice to sit down and sew!  This is another practice quilt and my practice quilts are pretty densely quilted, but I really need some practice on April - we were bonding.  Here's some pictures.    The quilt definitely has texture.  This was all done free hand.  The veins in the feathers and edge of the petals on the flowers in the red squares were marked.

Update - Binding is done!  This one is coming off the waiting to be quilted list and on to the 2011 quilts list!  I think Smith Mountain Morning is going to be next - it's a Bonnie Christmas vacation for me :)   And I'm all caught up in Orca Bay, ready for clue 7 tomorrow.  I think that's something to Whoop about so I'll be linking up with Sarah, stop by to see what everyone else is Whooping about. 

Update:  2011 year in review.  I've added a few of my favorites, what a great quilting year it's been.  Hope 2012 is even better!!  Happy new Year everyone.
 

Tuesday, December 27, 2011

I'm soooo excited


April and I are bonding!!  I finished on practice piece yesterday.  It took me four days to finish that and each day I saw progress (which was good cuz the first day was really bad!!).  Once that was finished I loaded a practice piece that I had started when I was working on the french braid quilt.  I started a practice table runner for the feathers.   I never finished it.  Well I didn't finish it until today!  And I think it's very difficult to tell which part I did on my DSM vs April.  Which I am pleased as punch about!! 

I did free form feathers, marking the veins. There was a border around the entire thing just like the diagonal strips that you see.  But I got a little carried away trimming it and well, there is no outer border any longer.  Hey it was a practice piece after all :)

Now there are certainly mistakes throughout the entire piece and those will improve with time.  Now I think I'm going to put fair and square on there and see how I do with that one. 

Monday, December 26, 2011

Design Wall Monday

All the kids are gone and husband has a full honey-do list so that means I get to sew and sew and sew today!!

Here's my progress on Orca Bay, I just LOVE LOVE LOVE these blocks!!  I haven't finished step 5 yet, I do a little every day on those, they'll get done.


I need some practice quilts for April so I made these blocks on Friday - this is Apple Crate  from the Moda bake shop.  This went together in an afternoon, very easy and quick.  This may be the first real quilt that I use for April.  I just need to sew them all together.  But I have to work at least for an hour on Orca bay.

Linking up with Bonnie to see how others are doing on Orca Bay and all the wonderful design walls at Judy's 


Friday, December 23, 2011

Orca Bay progress Step 6 and Holiday Greetings!

It was like Christmas here today.  Look at what I got in the mail from QUTI (Quilting Under the Influence).  A wonderful bag with logo, an adorable hat with logo, 4 gorgeous fat quarters and some yummy tea.  Thanks so much to Linda for a great give away!!  I LOVE the hat!!

And there was more for goodness sakes.  I got this incredible fabric pack from Jennifer at Gable House Sewing  I love Kate Spain fabrics, the Fa La La La fabric is way too cute. 

Thanks so much to both Jennifer and Linda.  Getting those wonderful gifts in the mail energized me and I actually got a little sewing done (I mean really little) but it's something :)


If you are working on Orca Bay, you got an early surprise on Thursday, clue 6 was up!!  Dang, I was planning on spending Thursday getting clue 5 done.  But when I saw those adorable blocks I skipped right over poor neglected step 5 and raced on over to step 6.  I have 5 of each block together, but percentage wise, it's more than what I have done for step 5.  Well there's always next Monday.  I love purple and green together. I hope we are done with purple (Bonnie's black) cuz I'm fresh out of purple. 


We have a new resident at our house :)  I'd like to introduce April, she's a pretty big girl and I just love her.  I've been trying to get to know her over the past few days and my stitches are starting to resemble quilting, but I think I have a couple more weeks ahead of me before I try a real quilt. 

Here she is with a shot of my practice stitching.  When I"m sewing closer to my body it's a lot better, the further away from my body I go the boxier the shapes get.  It all takes time.  I'm having fun passing the time with April.

Linking up with Sarah to see what everyone is Whooping about the Friday before Christmas.


I'd like to wish you all a peaceful, joy filled holiday season in what ever way you celebrate.  Happy Holidays!!

Monday, December 19, 2011

Design Wall Monday - Orca Bay progress Step 5

Well I got nothing for this Monday.  Not one single stitch this weekend, not one.  Man o' man.  But short work week this weekend  - woohoo!!

Design Wall - I'm putting a new one and it's  b-e-a-t-i-f-u-l (or will be when it's finished :).  We are finishing a 16.5 x12.5 room for April who's coming here on Wed.   April is my new used Millennium, so excited!!!!  I used one entire wall  for the design wall.  It's floor to ceiling and 16.5 ft long.  Now how many UFOs can I have going on that baby????    Wed, April comes, and vacation begins.  You will hear the hum of sewing machines for days after that. 

I didn't even cut one piece for the Orca Bay.  But hey, what's 700 little triangle eh?  I've got Wed and Thurs all day to get those  done.

Don't for get to stop by and see others who actually did something on Orca Bay this week at Bonnie's     And at Judy's there are always wonderful things being shown on design walls that are a bit more productive than mine.

Oh and Mommarock are you out there?  Haven't gotten your address, please send it.  If I don't hear from you by the time April gets here, I'll be forced to draw another name.

Have a wonderful week everyone.   Have a peaceful, safe and joy filled holiday season however you celebrate.


Saturday, December 17, 2011

And the Winner is.....

Wow, I can't believe the response to the give away!!  167 comments, holy smokes.  And our friends at random.org chose entry #9 who is Mommarock and likes novelty prints in scrappy quilts! Ok Mommarock I've sent you an email if I don't have a response within 48 hours I'll pull a new winner.

Hope everyone out there wins a little something.  That was exhausting going to all the giveaways wasn't it!  I think I spent 2 whole days going from blog to blog.  But I did find quite a few inspiring and interesting blogs that I follow now.  What fun.

Wishing everyone has a safe, peaceful and joy filled holiday season!!


Friday, December 16, 2011

Yep it's gonna happen, April will be joining us next week

That's right, I am gonna do it.  Santa thought I was good enough this year and bringing me a used Millennium machine with a 14 ft table!!   I am soooooooo excited.  I've already named her April, now just need to clear a spot for her when she's delivered on Wed!  I"m going through all the websites for tutorials in anticipation of my training on Wed.  Did I say I was excited? !

Here's a picture of the little cutie before she comes home.

And just a quick reminder, only a couple hours left to enter your name in the giveaway here.  I'm amazed at the number of entries!!

Wednesday, December 14, 2011

Maybe...Maybe...getting a long arm machine

Anyone have good or bad experiences they would like to share? Little pearls of wisdom that I might use in my search? Any advice is greatly appreciated.  My husband made an off hand comment about it and I think I'll run as far as i can with it!

Monday, December 12, 2011

Design Wall Monday - Orca Bay progress - Step 4


Finally we get to use the main color.  I'm about halfway done with step 4 and I must say I am completely and utterly in love with string blocks!  I never really cared for strings and hadn't even tried until Roll Roll Cotton Bowl.  And I was bitten by the string bug then.  I loved the neutral strings.  I did another string quilt after that in black and white and really like that as well.  I've used strings (again mostly in neutrals) when I don't have a large enough piece of fabric for my project - I make one out of strings.  But this is the first time I'm doing strings in color and my goodness I'm totally smitten this time.  First the blue ones were so cute, and then the green ones - oh my I'm in heaven!!  Green is my favorite color and I just love how these look.

Now let me say that I have no idea how these are going to turn out, and actually I am 100% wrong so far at guess what Bonnie is going to do. So you can pretty much say it WON"T look like either of these :)  I just wanted to see how the colors all look together and I like it!!

Don't forget to check out the Give Away here, I'm giving away a copy of  "Fat Quarter Quilts" and 4 fat quarter.  You don't have to be a follower to enter.  The winner will be drawn on 12/17 so you still have time.  There are over 230 quilters participating in the give aways all week long at Quilting Gallery   Stop if you're feeling lucky :)

Linking up with Bonnie's to see the progress everyone is making on Orca Bay.  And there's always fun stuff going on the design walls at Judys  And check out Quilt Story on Fabric Tuesday, there's  also something creative going on there

Friday, December 9, 2011

It's time for a give away!!!!!

Wow, I can't believe that I hit 100 followers this week.  I'm amazed and thankful to all of you.   I have to say that I've been blogging for a little over a year and have grown so much from the online community. Just want to say "thanks" with a little bit of a give away.I have an extra copy of M'Liss Rae Hawley's "Fat Quarter Quilts".   And I'm going to throw in 4 fat quarters.  
 

It's an easy give away with 2 chances to win.  
  1. Leave a comment if you are a follower (you don't have to be a follower to win, see below) - that's one chance.
  2. Leave a comment for what type of fabric you like most in a scrappy quilt.  I'll add 4 fat quarters to the winnings based on your comments - another chance to win .  
Me, I love brights and batiks in scrappy quilts!!

 A random winner will be chosen on 12/17!!  Don't forget to stop by and see what all the other bloggers are giving away!! 
Blog Hop Party with Give-Aways

Tuesday, December 6, 2011

Hosting a giveaway on 12/9!!

I am so close to having 100 followers and Quilting Gallery is celebrating it's 4th birthday!!  I'm celebrating by having a give away.  Just a nice way to say thanks to those who follow and stop by to provide inspiration, encouragement and your thoughts.  You are very much appreciated!

So if you'd like to join in the fun, it's not late to register, and you must register for the give away.   Stop back on Friday to see what I'm giving away!!

Blog Hop Party with Give-Aways

Sunday, December 4, 2011

Occupy your sewing room

And that is just what I did this weekend.  Cat Patches is hosting Occupy your sewing room.  Occupy your Sewing Room will run from December 3 - 10, 2011. During that week, plan to occupy your sewing room for a full day. If you can't spend a whole day, then divide it up into whatever increments you like.  If you haven't joined, it's not too late.  And there's a giveaway at the end!  Some great prized 


Occupy Sewing Room


So what did I do while I was occupying me sewing room this weekend?  I can't believe how much I got done.  I stayed off the computer and in the sewing room.  After this post, I'm doing some blog hopping to get my internet fix :) Ah, back to sewing and what I got done.

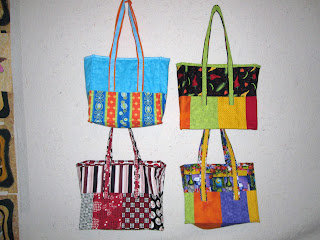
1.  I finished the reusable-washable shopping bags and made my first ever tutorial which you can find right here
Here are the last two bags, one is made of the left over army uniforms from my niece. Uh oh, I"m using her uniforms that she sent me for her Christmas gift....may I ought to get a little something extra in there for her. So that takes care of the 7 nieces and nephews, just need to get some goodies for the bags.


2.  I made a 6 great niece and nephews a gift card wallet.  I used a free pattern that I found, super cool wallet All I have to do is add a gift card and done.  These were so easy to do.   I can never finish anything in an hour, but really one of these can be done in less than an hour. And that's even taking 15 minutes to figure just the right fabric.  I think they'll like them, maybe not as much as the gift card !


3.  I finished the last two thank you gifts for the shower next weekend. I was cutting that pretty darn close.  The first one is a tutorial from Janssen Designs, I knew as soon as I saw this I had to make it.  All from scraps, binding, batting everything but the backing.  You just can't beat that.  The tutorial is here
The second one is a pattern from Dec/Jan issue of Quilters Newsletter.  I used the left overs from the tree skirt.  Crazy bright colors!

4.  Yes there still more!  It's been a while since I've made any baby things, what at least 2 weeks right? !
And really this one shouldn't count cuz there was no sewing at all.  Just some cutting, some spray adhesive and some glue.  But Little Baby Miles now has a lamp to go with his nursery ensemble.  All you do is make a pattern for the lamp shade.  I used large news print sketch paper, a news paper would work fine.  Lay the shade on the paper, roll it from start to finish and trace on paper as you roll and there you have a perfect shape pattern. I cut mine about an 1/8 in smaller than the pattern. Spray some permanent adhesive on the shade, and attach your fabric.  I made some 1/4 bias tape and finished it off with that, I just glued it with permanent fabric glue.  Adorable and so easy, no sewing!

5.  The last thing did not get finished but it got started and that's 350 little HSTs for Orca Bay.  I LOVE LOVE LOVE HSTs.  I've made an entire quilt out of HSTs, so fun.   But I just didn't have enough time this weekend for all that fun, there's only so much fun you can cram into a weekend.  I've got about 120 done, and hopefully will get the rest finished by the next clue.  Oh and goodness did you see all the people that joined in the linky party for Orca bay, that is so cool to be able to see everyone's progress.

And that's it for this week.   Be sure to stop by Bonnie's to see the progress everyone is making on Orca Bay.  And there's always fun stuff going on the design walls at Judys  And check out Quilt Story on Fabric Tuesday, there's  also something creative going on there.


Fresh Poppy Design


Friday, December 2, 2011

Reusable - Washable - Shopping Bag Tutorial

Printer Friendly Version 

Cutting directions
  • Lining Material – 1 – 21x33 square
  • Outside Material – 1 – 21x 33 square (can be a solid pieced, something that is pieced together … get creative!)  
  • Fusible Interfacing  - 1-21x33 square (if you don’t have this, you can always use scraps of batting, you just need something to give some structure to the bag – when I use batting, I quilt just the batting and the lining, leaving off the outside of the bag until it’s time to sew it together)
  • Outside Material – 2 – 3.5 x 40 strips
  •  Fusible lightweight  - 2 – 3. 5 x40 strips
  • Coordinating Material – 2 – 2x40 strips
  • Here’s my fabric.  As you can see I did piece my outside.    The yellow is my lining. I didn’t have one full piece of lining and that is pieced as well.  I was using what I had and hey, it is the inside of the bag right J


Sewing Directions
  • Fuse the interfacing to the lining fabric and to the largest of the strips for the handles.  Interfacing goes on the wrong side of the fabric.  If you are using batting instead of interfacing, quilt the lining fabric to the batting.  The outside of the bag will be added in the next step


  • Now it’s time to start sewing.  Put right sides together of the lining and the outside of the bag.  Sew all the way around leaving a small opening to turn when done


  • Iron when turned.  Make sure those seams are nice and crisp!


    • Fold in half with the outside right sides together.  Sew along each end leaving the top open.

    • Iron open the seams on the inside of the bag.  


    • Mark a 3 inch square on the lower corner of the bag.  When marking on the side of the bag, mark from the sew line, now the edge.  


    • Cut out the square on each corner.


    • Now I like to sew down the seams.  I do this before I make the corners.  Once that is done.  It's time to make the corners.  Take the corners that were cut and line up the seam right in the middle.  Make sure all layers from inside the bag are pinning and lined up nicely.    If you grab the inside corners and line them up, it goes into place very easily.  Pin and sew with a scant quarter inch.


    • Now turn the bag right side out, and sew this seam on the outside of the bag with a generous quarter inch seam.  Now it will be nice and neat on the inside, no raw edges.  Next I topstitch around the top of the bag.  I like my bags to stand up, so I sew each of the edges of the bag on the outside with a scant 1/4 inch seam.    When all that is done, all that's left are the handles


    • The handles, you're almost done now.  I like to fuse a light weight interfacing on the larger piece of the handle, just to make it a little sturdier.   Once that is done, right sides together sew with a scant 1/4 inch seam on all pieces, the 2 larger pieces and the 2 coordinating fabrics.  When done sewing, turn the tubes right side out and iron centering the seams of the tube.  


    • Then with seams together,  center the coordinating tube on top of main handle.  I turn the bottoms under a generous 1/4 inch and sew each side down.


    • I like to have about twelve inches at the top for the straps.   With that in mind measure how far down you need to have your straps.  These were slightly smaller than the 40 inches as I was using fat quarters for the brown and only had 36 inches for each strap. But that’s not a problem.  As long as I have  few inches sewn to the bag and roughly twelve inches above, it’s all good.  So for me, I used 4 inches as my guide.  I centered them in a position that looked pleasing and made sure there were on roughly the first quarter and third quarter position.  Depending on how you piece your bag your straps may move an inch or two.  But in general try to say in the 3-4 in space from the edge of the bag for good support. Sew down one side, across the bottom, back up and then sew an X at the top for added strength.  I sew this 3 times for each X
    • And that's it, now you have a completely washable, reusable, one of a kind shopping bag. Let's go shopping!  I hope you enjoyed my first every tutorial.