Monday, February 18, 2019

Trish's Lone Star Quilt

I just finished quilting this purple beauty for Trish.  She made this for her daughter and started quilting it but some issues prevented her from finishing.  The center of the star was quilted by her.  I found the digitized pattern and used that in one of the border.  That pattern was stars, leaves and curls. I took those and use that through out the quilt.  Trish wanted different designs in different areas and I think I covered that for her.   On the outer most border the more complicated design, the fabric was like a solid so you would be able to see it, then diamonds on one border, curly ribbon candy on another.  Curls behind the embroidered stars.   The fabric of the setting pieces for the star were so busy that quilting just wouldn't show, so I just did a nice feather in that areas, gives texture.  In the center of the star was a part that Trish had quilted.  I went over most of it in a similar color, then just added curls to the next row of diamonds.  After that, some continuous curve and more curls in the diamonds.

Add caption


back - shows nicely on the yellow

back


Batting warm and natural, thread Glide on top, bottom line in the bobbin. Thanks Trish for letting me quilt for you!

Check out all the linky parties on the side bar, so much inspiration out there. 

Friday, February 15, 2019

Friday Finish!!

I’m so excited, look what came today form #honestfabric ! I designed this for my husband and just haven’t been able to finish (started in 2013) I printed my design from eq7 and got it printed with custom printing at honest fabric. I can’t wait to quilt this!   Love when there's no piecing!!  
Custom Printing from Honest Fabric

this is what 6 years of working on this quilt will get ya!
Check out all the linky parties on the sidebar - so much inspiration out there 

Friday, February 8, 2019

Rhapsody in Blue - Reveal

Oh boy will you look at this?   Country Quilters of McHenry Quilt guild have been working on this quilt for some time.   Fabrics selected and cut, little block kits made, and came back then trimming, rows and finally a flimsy.  Then guess what happened, that's right I got to quilt this sweet thing!  And quilt I did.  They let me do what I wanted, the only restriction was not too modern.  Ok, but when you leave me unsupervised with a quilt, this is what's gonna happen, some thread is going down!  I had  a lot of fun with this.   There's two layers of batting, Hobbs 80/20 and Hobbs wool, glide thread on top, Ivory and two different shades of blue.  The back is a scrumptious cotton Sateen.  Lots of ruler work, lots of free motion feathers and even a little computerized quilting.  The center of all the stars has computerized motif.  It's the same motif on the center medallion star, just a bit bigger.  I gotta say I was  a bit nervous doing the quilting for the raffle quilt. The guild didn't have a quilt show and this is the main income source for the year.  But I think it turned out great.  


Now this beauty can be yours raffle tickets will be available very soon, they're getting printed now.  We'll have a few ways to purchase the tickets.  If you're going to the Chicago Quilt Festival in Mar, we will be selling tickets on  Mar 28 and Mar 30.  I'll be there on Mar 28 the morning selling tickets and the afternoon white gloving. I'd love to meet you, stop by and say hi!  They will also be available on Facebook for sale soon.  And of course you contact me directly.  I'll have all the details on the cost of the tickets and the date of the drawing very soon.   You can bet I'll be buying a few, I would love to have this hanging in my entry way!!  

Oh almost forgot the pattern is called Monterrey Medallion.

One other thing I want to share. It's that time of year again, Sarah has the Hand 2 Help Comfort Quilt challenge ready to go for 2019  Stop by and take a peak, I'm sure you're going to want to join in the fun.  See the link in the sidebar


I have a group of us who have been getting together for this for years now, we all look forward to this time of year.  We make quilts for H2H and for local needs. This year we're going to do it a little differently. We're going to make quilts for H2H and for the care givers this year.   

It must be difficult at times to be a caregiver for people who are the sickest, families are distraught and they must keep their chin up and be the bright light that these families may not have otherwise. So I'd like to give them a quilty hug as they need to self care and the job can be hard and emotionally taxing. If you know of an excellent care giver that could use a quilt to wrap in and let the world slip away for just a few minutes so they can care for our loved ones, send me a private message. The group of us will collect them all and determine at the end of the session. So come on and join us! Let me know if your in. We'll have our first get together in Mar, dates to come shortly, need to pick patterns and fabric and get some quilt kits cut and ready to go!

Monday, January 14, 2019

Chris's minis pack some big personality!!!

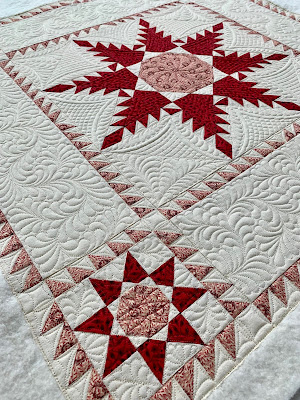
I just finished two mini quilts for Chris who blogs over at Chrisknitssews.  She made this two beauties! The first is the feathered star - oh oh oh my!! This sweet lil charmer is 29x29 inches - so you know those HST's gotta be tiny!  I just adore this red and white little quilt.  If I weren't so afraid of piecing I might even try my own. But remember my last finish?  The HSTs were 18 in square!!  One of these days I'll try.   Until then, I"m am just so happy that I get to quilt the works of art that others create!
Hobbs 80/20 batting, Glide thread - 40 wt on top, 60 wt in the bobbin, Micro quilter for SITD  I really am sad this one is going back


Tools used on this one, Linda Hrcka's curves 8 on the white areas, 12 on the red.  No marking for the cross hatch.  I actually found that I couldn't mark as accurately as I wanted so I used the lines on the ruler instead, worked well for these small cross hatch areas.  I did use a stencil for the center feathers, I wanted them to be a bit more accurate than if I did them with the aid of a stencil.  That little feather round is the most used stencil I have, it's come in handy so many times.  I used a 2.5 in circle guide for the curly feathers in the border.  I seriously just need to purchase a circle template set.  Who doesn't like twirly curly feathers?  Kim Brunner has a get book and DVD set.  I adore this one.
Yep that seam ripper was one of the most used tools on the berry baskets :)
You can see how I marked the spins of the twirly feathers, they are C's that have the opening offset.  So much fun!

As if that cutie wasn't enough, she made this 24 inch square berries basket quilt. The colors, be still my beating heart!  Just love these colors.  Cross hatch areas were a little bigger, but still no marking on these.  This was the first mini I have ever quilted.  Boy there is just no place to hide.  On a quilt with 30 blocks you can hide a mistake or two (or five or more).  But on these, nope, you have to be right on.  I did a bit of ripping of stitches and then I just slowed down.  For me, the quilting of a mini is just a bit different than any quilt that has more than 12 blocks!  It was a great learning experience for me and I loved quilting these for Chris.  Chris thanks for letting me quilt for you!
Hobbs 80 / 20 batting Glide thread top and bottom, 40 wt on top, 60 wt on bottom 


At our January Quilt Guild mtg I signed up for a round robin quilt "thing". A number of people signed up, and we trade them every month until they get pretty big then every 2 months - we're doing 6 rounds.  I decided to go outside my comfort zone and join in the fun.  I had grand dreams of piecing this wonderful center, starting the year off right and  you know doing the piecing thing.  Well, I decided that I'm going to use a panel for the center.  I just LOVE LOVE LOVE it.  It's actually fabric that I purchased at our Guilds Garage Sale, see putting that stuff to use right!  Just take a look below?  Isn't that just made for a round robin quilt?  I think so!  No piecing this time, but I promise to make it on the next round.  I've got this.  Well if I don't I may be asking for some help :)

A little progress on Good Fortune, I'm a bit undecided on this one, anxious to get some borders on
Oh I don't think I've the proper introductions.  I'd like to introduce our newest family member Isaac.  Zaffle left us on Halloween last year and I thought for sure that I would wait at least another year. But no, the break during the holidays made me realize I need a furry friend.  Well here he is.  This little guy has been down in the quilting studio, but hard to tell if he likes it yet or not.  Zaffle always kept me company when I was quilting. I think Isaac is going to love being down there.
hmmm is he amused or no?? I think yes!
Isaac, my new baby!

Now that those minis are done, I get to start on a special project.   This one I get to do what every I want.  Oh you know there's some thread that's going down now.  I can't share until the reveal so I'll have to think of something to do for next week...hmmm maybe I'll get some piecing done....ya that's it!

Hope everyone has a great week and don't forget to check out the linky parties on the side bar, so much inspiration out there!

Monday, January 7, 2019

June's Home and Hearth Log Cabin

I just finished this custom beauty for June.  First I'll show the pictures then a little bit on how we collaborated on the quilting design and the tools used.  There were things flying everywhere in the studio with this one!  Templates, rulers, stencils, marking tools, manila folders, all of it all over all the time, what fun! You can find June Bacchi on Facebook for more info on the wonderful quilt.  This one has two layers of batting, Hobbs wool on top, heirloom 80/20 on the bottom. Glide 40 wt thread on top and 60 wt in the bobbin.  Man, my machine LOVES this combination!


Now, wasn't that something.  The pattern is Hearth and Home from Today's Quilter Magazine.  They have a facebook page as well.  These blocks were really big and I'm not accustom to such large blocks.  For this I really wanted to try the pattern on the actual size block (rather than marking something up on the tablet).  I used florist cellophane (you can get a large roll from Amazon for less then 10.00 delivered to your door).  I use painters tape on the edges so it's crystal clear where the cellophane ends and the quilt is unprotected.   Then I just draw right on the plastic.  I had some ideas about some simple feathers in the colored part of the log cabin (without the house) and drawing that simple idea I quickly found out that was NOT going to work.  I was drawing a few ideas for the white area of the same block, one of them involved cat tails ( the plants not real cats :).  June  then thought 4 seasons would be good (which really is a great idea) but then she thought of the hearts, which was a fabulous idea.  After a bit of back and forth together we came up with the quilting design.  And that is how one idea leads to another which leads to another.... I love the collaboration.  It brings things that neither party would have come up with on their one.  I was just in love with this.  I  added a heart in the colored area a bit larger and that made the feathers much easier to quilt in that area. Then took the heart and put those on the door and above the door.  That unifies it all - my home is my heart as June puts it.  Home definitely is where the heart is for this quilt!


Good tool to find out what *doesn't * work.  The ones on the right were original thoughts until I drew then full size, then on to plan B

Other tools that were used once the design was done  - the sashing and first border needed a serpentine spine feather.  In Margaret Solomon Gunn's book Featherless Feathers she shows how to use adding machine tape to calculate (hehe) the curve for the space.  Fold in half as many times as you like, then mark the centers, add your curve and cut.  I used a really thin paper, so I took a complete piece of the arcs and made a template from a manila folder, one for the border, one for the sashing.  Worked like a charm.  I just used one of my many curved rulers for the corners.


Stencils - I used a couple of stencils for this project. The clam shells and the 1/2 in cross hatching were used on the roof and the bricks.  Deloa Jones has some wonderful grid based stencils I had one stencil with two hearts just the right size for the door and above the door.  No reason you have to use the entire stencils, just use the parts you want!!

I didn't have stencils nor did Santa bring me a set of circle templates, so I made my own hearts and circle again.  I add registration marks to the templates for ease in placement.

Rulers - of course I used used Linda Hrcka's curved rulers this one used the 20 and the 34, first time I got to use one of the big curves. Was perfect for this big blocks!  I also used Bethanne Nemesh garden line straight edge and quilters Rule curves - that is just a great one for same curves, used it on the curtains.

The usual marking tools no change here.

I'll be sad to see this feathered beauty go, Thanks for letting me quilt for you June, loved the collaboration and what we came up with for the quilting plan together!

I was having so much fun with this feathers that I neglected Good Fortune, but I did get a couple of the blocks done


Just an FYI  -  I am not affiliated with any of the products that I show here, I'm just a very happy customer and highly recommend their products.